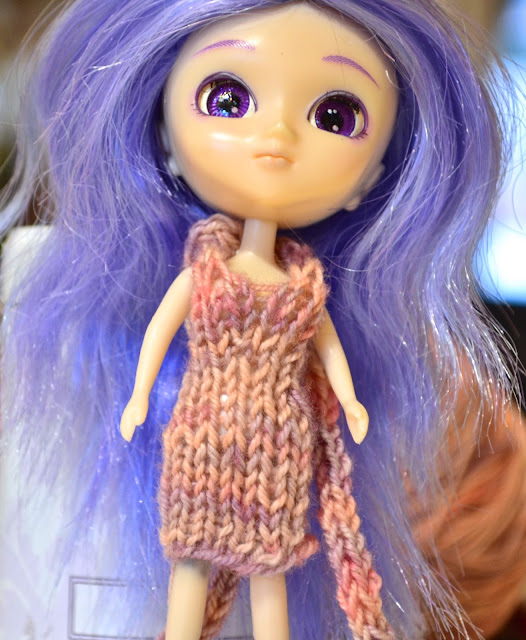
As promised months ago, here is my pattern for a miniature knitted pencil dress, designed for both Petite Blythe dolls, Dollcena Dolls and Little Pullips.
 |
| Little Pullip Doll in custom Hand-Knit Pencil Dress |
The pink mini pencil dress, worn by the Little Pullip doll above required less than 2 grams of yarn. I used Araucania Botany lace, which is a 4 ply fingering weight sock yarn, but any sock yarn with similar attributes will be suitable for this pattern. The construction of the dress allows you to easily adjust the design when fitting the dress on your doll whilst knitting.
Knitted seamlessly in the round from the bottom up, the pencil dress is secured at the back of the doll's neck with the help of two i-cords. The simple design can be customised by adjusting both the length of the dress itself and the length of the i-cords. In two prototypes of the design (worn by a Takara Tomy Dollcena below) I turned the mini into a maxi dress, but overall I prefer the shorter version.
 |
| Takara Tomy Dollcena Doll in Knitted Pencil Maxi Dress |
 |
| Takara Tomy Dollcena in Hand-Knitted Pencil Maxi Dress |
When knitting doll and other miniature knitting projects in the round, the hardest parts are casting the stitches on securely, ensuring they don't slip and twist when divided between the double pointed needles, as well as knitting the first few rounds neatly, thus getting the project off to a good start.
To achieve a firm cast-on edge and a neat appearance, I used the German Twisted Cast On, and I worked the piece on two rather than three double-pointed needles holding six stitches each. But this might just work best for me. So, feel free to use whatever methods and techniques you are most comfortable with.
 |
| Knitting in the round on two double-pointed needles |
Materials & Tools
- Sock Yarn
- Two Beads (for securing the I-Cords)
- 3mm Double-Pointed Needles
- Scissors
- Safety Pin
- Darning Needle & Sewing Needle (for sewing in ends and securing the beads to the i-cord)
 |
| I-Cord Detail - Hand Knit Dress for Pullip / Petite Blythe |
Project Notes
- Cast-on 12 stitches using the German Twisted Cast-On.
- Divide the stitches evenly between two double-pointed needles. Place stitch marker to mark beginning of round.
- Join in the round - knit the first stitch of the first round with the live yarn. Knit the second stitch with the shorter yarn string left over from casting on. Slightly tug on both strings, ensuring the stitches are sitting securely on the needle. Knit to end of round with the live yarn.
- Continue knitting in the round until your piece measures 1.5cm to 2cm in length.
 |
| Checking the Fit |
- Check the fit against the doll's body at this stage. When you feel the piece is long enough, move on to the decrease row for the waist decreases. If the skirt is too short, continue knitting in stockinette stitch until you have reached the desired length.
- On the decrease row you will need to decrease two stitches. This will shape the waist. The decreases can be placed anywhere you like, but in order to achieve a neater look, I decided to place my waist decreases exactly where the live stitches on both double-pointed needles meet one another - stitches 6 and 7 and stitches 12 and 1, i.e. the first stitch from the following row. If you follow this step, this means the decrease row crosses into the next knit row.
 |
| I decided to place my waist decreases exactly where the live stitches on both double-pointed needles meet one another |
- Decrease Row: K 5, k2tog, K4, slip marker, ssk - you now have 10 stitches in total - 5 stitches at the front and five stitches at the back of the dress.
- Continue knitting to end of round.
- Continue in stockinette stitch until the piece has reached the desired length, the doll's torso is sufficiently covered and there is a snug fit overall.
- The front of the dress will have 6 stitches in total and you are required to increase 1 stitch right in the middle of the front section on the next row.
 |
| Little Pullip Doll in Custom Hand-Knit Dress |
Shaping the Torso
- Increase Row (front of dress): K2, kfb, k to end of round - 11stitches
- Decrease Row (decreasing at the back of the dress): K6, k2tog, K1, ssk - 9 stitches
- K6, bo3 stitches - 6 stitches
- Knit the remaining 6 stitches (front of dress) flat in stockinette stitch until the piece has reached the desired length. Then it's time to move on to the i-cords.
I-Cords
- K3, place the remaining 3 live stitches on to a safety pin.
- Start knitting the first i-cord with the first three live stitches still attached to the yarn. Continue knitting the i-cord until it measures approximately 10cm. Bind-off and fasten bead securely at the end of the i-cord.
- Remove live stitches from safety needle and proceed to knit the second i-cord with the remaining three live stitches. When the second i-cord measures 10cm, bind off and place bead to fasten.
Update: I have recently completed a similar dress for a Monster High Doll. A sneak peek of the dress is available here. The pattern for the Monster High dress will be released on the blog very soon.
Should you require pattern support, please feel free to contact me via Ravelry, Twitter, by e-mail or leave a comment below.
Should you require pattern support, please feel free to contact me via Ravelry, Twitter, by e-mail or leave a comment below.


No comments:
Post a Comment